Setting up Ghost on a VirtualBox Shared Folder
A few months ago, when I decided it was time to actually put a blog on my website instead of an "Under Construction" message that had been sitting there for five years, I chose Ghost as my CMS of choice. I'm a WordPress developer by trade, but WordPress has the kind of power I don't need on a blog. I don't need post types, custom fields, user management, or plugins; I just need to write things down for all eternity. Plus, Ghost looks pretty good out-of-the-box, which saves me a whole lot of design time. When it came time to try it out, though, my initial installation didn't go so well.
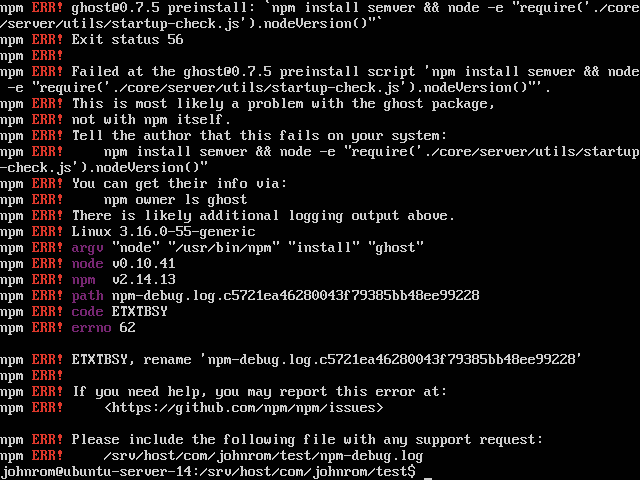
Okay, that's pretty scary. I might have a pretty edge case. I run a Windows 10 host, with an Ubuntu Guest. However, all of my server files are on my Windows 10 host. So Ubuntu is actually trying to install Ghost on a shared folder mounted on my F: drive.
/srv/host/com/johnrom/test/
Setting up Ghost on a VirtualBox Shared Folder isn't simple. Basically, installing sqlite3 is impossible on a shared folder, even with symlinks enabled. This has to do with the fact that SQLite3 must be compiled by node (or node-pre-gyp, whatever that is). Then, we have to set up Forever in order to run Ghost on every boot, which also proved a bit troublesome. However, let me walk you through it!
You must have administrative privileges on your device to use this tutorial. I'll be using a Windows 10 Host with an Ubuntu Server 14.04 Guest for this tutorial.
Step 1: enable symlinks on VirtualBox
My Virtualbox is called "Dev Server" (very unique, I know)
I found the exact name by opening Command Prompt and typing "VBoxManage list vms"I call my share "projects-com" in the VirtualBox Shared Folders interface.
Given these tidbits of information, we can now enable Symlinks for this mount point by entering the following into cmd.exe (one line, even if it looks broken)
VBoxManage setextradata "Dev Server" VBoxInternal2/SharedFoldersEnableSymlinksCreate/projects-com 1
Now that we've done this, be sure to open VirtualBox as an administrator from now on. We'll make this easy by right-clicking the VirtualBox icon in the taskbar (or the shortcut on your desktop), going to properties -> compatibility, and checking "Run this program as an administrator"
Step 2: install Node and NPM
Let's get node up and running, as that is a task all on its own.
We're basically following this guide to install Node on Ubuntu 14.04. Use sudo if you aren't running as root.
sudo apt-get install --yes build-essential curl
curl -sL https://deb.nodesource.com/setup_5.x | bash -
sudo apt-get install --yes nodejs
If you don't use Ubuntu 14.04, check the compatibility list and make sure the version of node you are downloading is compatible!
I think I had to update npm to a better-supported version after installing from the repo, so let's do that.
sudo npm install -g npm@latest-2
Step 3: Install Ghost (not on your shared drive! )
We're not ready for the shared drive yet! So let's create a temporary directory and get Ghost going.
# install unzip
sudo apt-get install unzip

cd /tmp
mkdir ghost
curl -L https://ghost.org/zip/ghost-latest.zip -o ghost.zip
mkdir ghost
unzip -uo ghost.zip -d ghost
cd ghost
npm install --production
Step 4: Copy Ghost to the Shared Drive
Hopefully you made it this far. Now, we're going to copy Ghost to our Shared Driver, preserving all of the symlinks that exist among the modules Node just installed. Luckily, on Ubuntu these symlinks will be relative, and it does a great job of copying them with the following command:
sudo cp -ad . /path/to/your/document/root
Let's check and make sure Ghost doesn't crash and burn!
cd /path/to/your/document/root
npm start --production
Step 5: Running Ghost on Startup with Forever
If all went well, Ctrl+C out of npm and let's get started running Forever. Forever is a NPM service that will handle starting the server for you and running it forevever. Let's install it:
npm install -g forever
For this unique case of running Ghost on a VBoxSF shared folder, I find that shares are the happiest when you run them through /etc/rc.local, so I will assume you have read how to set up Ubuntu 14.04 on VirtualBox which covers this topic at the end.
The following technique allows Forever to run Node as the www-data user.
First, we need to make sure www-data has an accessible home directory.
sudo nano /etc/passwd
Then, we'll find the www-data user, and it should say /var/www or /home/www-data. Whichever one, we will navigate to that directory and set it up for write access for www-data (don't keep anything important in this directory! This doesn't have to be the location of your server files, it is not mine.)
sudo chown www-data:www-data /var/www # (or /home/www-data)
Now we're going to open up /etc/rc.local, and it should look like similar to the following, having replaced my shared folders with yours. Also replace /srv/host/com/ghost with the location of your ghost installation!
# temporarily set logging for this file, to debug any issues
exec 2> /tmp/rc.local.log
exec 1>&2
set -x

sudo mount -t vboxsf -o fmode=666,umask=0002,uid=www-data,gid=www-data projects-com /srv/host/com

# this is the magic
sudo -u www-data NODE_ENV=production /usr/bin/forever --sourceDir /srv/host/com/ghost start index.js
Restart the server and check /tmp/rc.local.log
sudo shutdown -r now
nano /tmp/rc.local.log
If it ends with something like the following, we're ready to move on!
info: Forever processing file: index.js
+ exit 0
Step 6: Setting up your Server
If you already know the ins and outs of Apache or NGINX, feel free to do this your own way. Just know that Ghost listens on port 2368 by default.
It is atypical, I know, but I'm going to use Apache for this part because that's how my dev server is built. If you don't have Apache yet, just run
sudo apt-get install apache2
We need to add some modules to Apache for passing the data through to our NPM server.
sudo a2enmod proxy
sudo a2enmod proxy_http
Then, we'll create a VirtualHost under /etc/apache2/sites-available/ghost.conf
nano /etc/apache2/sites-available/ghost.conf

<VirtualHost *:80>
    ServerName ghost.dev

    ProxyRequests off
    ProxyPass / http://127.0.0.1:2368/
    ProxyPassReverse / http://127.0.0.1:2368/
</VirtualHost>
Restart Apache...
sudo a2ensite ghost
sudo service apache2 restart
If Node was started correctly, Apache should now be connected to ghost at the domain ghost.dev.
Step 7: Edit your hosts file to point to your server
For this part, you will need to set up a VirtualBox Host-Only Adapter for your VM, and know the IP address of your server, which I covered in setting up Ubuntu 14.04 on VirtualBox. Mine is 192.168.56.2, so replace that with your server's IP.
On your host, run Sublime Text or your text editor of choice as an administrator. Navigate to /etc/hosts on Mac or Linux, or C:\Windows\System32\drivers\etc\hosts on Windows, and append the following line:
192.168.56.2 ghost.dev
Step 8: Enjoy the elegance that is Ghost
Fire up a browser and navigate to ghost.dev for a welcome message! That's all! That was no trouble at all, now, was it?!
If these instructions didn't work for you, feel free to leave a comment with your errors or questions. Up next, I will set up Ghost as a service so that I can quickly restart the Ghost server for development purposes.